This is my Evaluation for my Manmade VS
Nature project I was unsure from the start whether I would look at Manmade or
Nature.The first thing I needed to do
like every other project was to buy a new sketchbook, as I didn't have much
money at the time I decided to make my own sketchbook. After making a
sketchbook I was informed to start collecting primary research as it vital when
starting a new project, after starting this project I took photos of a set-up
we did as part of our project, I also went to Sheffield for a shopping trip and
whilst I was there I thought it would be a perfect time to take photos, I took
photos of the buildings and some light fittings I had seen in a shop that
looked very intricate.
After collecting my primary research
images I decided to gather some secondary research, still unsure which path I should
take with either Manmade or Nature I gathered images for both of theme, I also
drew from the observational drawing we had in the middle of the room, I used a
variety of different media for this like: chalk, ink and stick, white paint and
drawing on an uneven surface whilst drawing the set up I moved around it so I had
a different section to draw every time.
When doing my research I came across an
artist called Patrick Dougherty and I found his work amazing, he would use
crape myrtle tree cuttings, twigs and vines and create huge scaled pieces
ranging up to 40 feet tall from looking at his work I thought that I would
possibly look more into natural things. In my secondary research I had found
photos of rust which made me think more about looking into metal things and
already in my sketchbook there were images of clocks which then made me thing
further and think about the cogs inside the clocks.
For my mood boards I did one on manmade
and one on natural as I was still unsure, on my natural mood board I used leaves
but over time they decayed, became dull and crispy which made it look a little
weird over time but I still like it, on my manmade mood board I looked at
lights at first but I also added some keys onto it. After doing my mood boards I
started my visual sheets, I still was still unsure which theme to choose so I did
one on each again. For my manmade I used keys and light bulbs that I had
previously used on my mood board and after looking at clock cogs I decided to
add those onto my sheet too I think they looked really good with the keys. For my
natural I used the butterfly and drew some leaves I used on my previous sheet, I
also drew some roses and feather onto it as I had a picture of roses on my mood
board and I had drawn roses and feathers in my sketchbook.
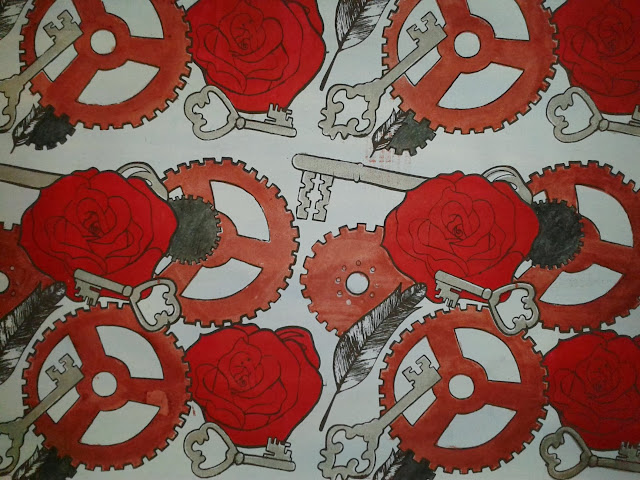
After sitting down and thinking I came up
with the idea of combining manmade and natural together, I thought I would take
my roses and feathers that were drawn on my visual sheets that are very subtle and
delicate and then take something very heavy duty like my cogs and my old styled
keys and combine the two together to show difference between the two. After finally
deciding my combination of the two I then worked on my development sheets, I when
on the internet and found patterns and images of leaves and roses and placed
them inside my keys and cogs and on the other sheet vice versa.
During this project I have also learnt some
more new textile techniques, I already knew how to wet felt but everything else
like: weaving, knitting and needle felting were brand new to me. Knitting was
the first thing on the list and I could not get to grips with it all to start
off with, I could cast on and was hopeless at just knitting in general but now
with a bit of practice I think I’m pretty good at it, they’re aren’t holes
running through it from dropping stitches and I can now cast on and I’ve taught
myself through YouTube how to cast off as well. Using the peg loom was my
favourite thing as I loved creating different weaves and I would love to buy a
peg loom and try and create my own blanket. Felting is the only thing I have
done before I’m not a big fan of wet felting but I knew exactly what to do,
after creating my felts I used them for needle felting I wish I had given
myself more time to create a lot more needle felting samples as I enjoyed it,
it’s something I’d use in the future.
Throughout this project I have had to
problem solve and try and experiment a lot, in my samples I have used batik
which I don’t really like using as its quite messy but it actually looks quite
nice in some of my prints, a lot of my prints have puffbinder outline and I think
it looks really nice. Whilst printing I’ve found out from trial and error to
tape up my board to stop procion getting on my work. After creating my samples I
got placed with two people and had to give a small presentation they then
picked out 3 designs which they though could be combined together and worked
into, after being told what would look best I did a sample and I think it is
probably the best combination that they could have picked.
When going about my final piece I decided
to get all of my outlines and roses done and then print my cogs and keys, as I explained
earlier I had to restart my piece 3 times from forgetting to tape my screen up
like the rest which set me back with time and resources. On my final print I had
coloured all of my print and on the final print of my outline the screen moved
and has doubled the image up and with me having no time left I had to leave it,
I was going to cut it off but then I would not have a 1 metre wallpaper piece.
Time management during this project hasn’t
been a huge issue and overall I think this project has gone better than I
expected it go, my strengths have been managing 4 screens and working well to
get my print done with so many screens but it’s just a shame my last print
smudged. If I could do this project again and improve something it would
definantly be my sketchbook.