Sunday, 26 January 2014

Mood Boards

This is my first mood board I have produced, I have took a previous drawing that I have done of an ocotopus and also added two pictures from textile designers: John Rhoda and Iris Van Herpen's dress designs which are ocean themed.


Sunday, 19 January 2014

Live Brief: Moo

On Friday I was given a new project, we've been given a design brief from a shop in my town called Moo, they want me and the rest of my class to design a piece based around Invertebrate Sea Marine Creatures. This will be a competition and the person that wins will have they're piece made and sold in Moo.

Thursday, 16 January 2014

Evaluation: Manmade VS Nature

This is my Evaluation for my Manmade VS Nature project I was unsure from the start whether I would look at Manmade or Nature.The first thing I needed to do like every other project was to buy a new sketchbook, as I didn't have much money at the time I decided to make my own sketchbook. After making a sketchbook I was informed to start collecting primary research as it vital when starting a new project, after starting this project I took photos of a set-up we did as part of our project, I also went to Sheffield for a shopping trip and whilst I was there I thought it would be a perfect time to take photos, I took photos of the buildings and some light fittings I had seen in a shop that looked very intricate.

After collecting my primary research images I decided to gather some secondary research, still unsure which path I should take with either Manmade or Nature I gathered images for both of theme, I also drew from the observational drawing we had in the middle of the room, I used a variety of different media for this like: chalk, ink and stick, white paint and drawing on an uneven surface whilst drawing the set up I moved around it so I had a different section to draw every time.

When doing my research I came across an artist called Patrick Dougherty and I found his work amazing, he would use crape myrtle tree cuttings, twigs and vines and create huge scaled pieces ranging up to 40 feet tall from looking at his work I thought that I would possibly look more into natural things. In my secondary research I had found photos of rust which made me think more about looking into metal things and already in my sketchbook there were images of clocks which then made me thing further and think about the cogs inside the clocks.

For my mood boards I did one on manmade and one on natural as I was still unsure, on my natural mood board I used leaves but over time they decayed, became dull and crispy which made it look a little weird over time but I still like it, on my manmade mood board I looked at lights at first but I also added some keys onto it. After doing my mood boards I started my visual sheets, I still was still unsure which theme to choose so I did one on each again. For my manmade I used keys and light bulbs that I had previously used on my mood board and after looking at clock cogs I decided to add those onto my sheet too I think they looked really good with the keys. For my natural I used the butterfly and drew some leaves I used on my previous sheet, I also drew some roses and feather onto it as I had a picture of roses on my mood board and I had drawn roses and feathers in my sketchbook. 

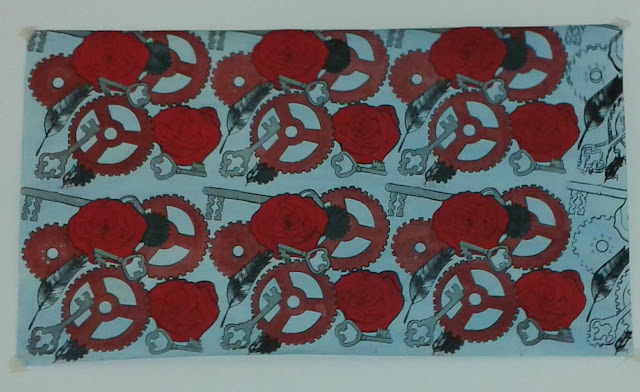
After sitting down and thinking I came up with the idea of combining manmade and natural together, I thought I would take my roses and feathers that were drawn on my visual sheets that are very subtle and delicate and then take something very heavy duty like my cogs and my old styled keys and combine the two together to show difference between the two. After finally deciding my combination of the two I then worked on my development sheets, I when on the internet and found patterns and images of leaves and roses and placed them inside my keys and cogs and on the other sheet vice versa.

During this project I have also learnt some more new textile techniques, I already knew how to wet felt but everything else like: weaving, knitting and needle felting were brand new to me. Knitting was the first thing on the list and I could not get to grips with it all to start off with, I could cast on and was hopeless at just knitting in general but now with a bit of practice I think I’m pretty good at it, they’re aren’t holes running through it from dropping stitches and I can now cast on and I’ve taught myself through YouTube how to cast off as well. Using the peg loom was my favourite thing as I loved creating different weaves and I would love to buy a peg loom and try and create my own blanket. Felting is the only thing I have done before I’m not a big fan of wet felting but I knew exactly what to do, after creating my felts I used them for needle felting I wish I had given myself more time to create a lot more needle felting samples as I enjoyed it, it’s something I’d use in the future.

Throughout this project I have had to problem solve and try and experiment a lot, in my samples I have used batik which I don’t really like using as its quite messy but it actually looks quite nice in some of my prints, a lot of my prints have puffbinder outline and I think it looks really nice. Whilst printing I’ve found out from trial and error to tape up my board to stop procion getting on my work. After creating my samples I got placed with two people and had to give a small presentation they then picked out 3 designs which they though could be combined together and worked into, after being told what would look best I did a sample and I think it is probably the best combination that they could have picked.

When going about my final piece I decided to get all of my outlines and roses done and then print my cogs and keys, as I explained earlier I had to restart my piece 3 times from forgetting to tape my screen up like the rest which set me back with time and resources. On my final print I had coloured all of my print and on the final print of my outline the screen moved and has doubled the image up and with me having no time left I had to leave it, I was going to cut it off but then I would not have a 1 metre wallpaper piece.

Time management during this project hasn’t been a huge issue and overall I think this project has gone better than I expected it go, my strengths have been managing 4 screens and working well to get my print done with so many screens but it’s just a shame my last print smudged. If I could do this project again and improve something it would definantly be my sketchbook.


Needle felting

Whilst learning new things, a few weeks ago I learned how to needle felt. Needle felting was a really simple process which just involved using a small needle this barbed bits on the end which helps the wool fibres stick on the felt. I enjoyed trying out needle felting and I would use it again in future projects.

Wet felting

During my new project I have to do wet felting, this is a process that I have used and practiced before. Its not one of my favourite things to do but this textile process was necessary to create a background to use for my needle felting piece.  


First of all you need to get your strands of wool and lay them across a piece of bubble wrap which in on top of  a towel. When layering up your wool your wool pieces will only need to be thin.


After you have layered up your wool you will need to take a piece of net and place it over the top of, after doing this you will need to completely cover all of this in water. Give it a good drench but make sure its not over flowing and water is absolutely everywhere.


After wetting your wool take the net off, if you don't take the net off it will bind to the wool whilst your felting. Roll all of the felt up in the bubble wrap and roll for 5 minutes after rolling for 5 minutes unroll your bubble wrap and pull the edges, keep rolling until no wool comes off.

Saturday, 11 January 2014

How to use a peg loom


Using a peg loom has been my favourite task that we have done during this project and I am actually contemplating buying my own peg loom and creating weaves at home. If your a newbie to using a peg loom this is how to use one.


This is what my peg loom looked like, its a plastic peg loom with 14 pegs but this certain peg loom can have extra pieces added to the end on the jigsaw like piece to extend your weave and make it longer. 

First of all you will need to cut off 14 pieces of string, (I cut mine to about 40cm so they would be longer and its easier to tie your weave off at the end) after cutting off your pieces of string you will need to put your pegs in so that the holes are facing inwards not forwards. Put your string through the holes and tie 2 of the pieces of string together.


This is what your peg loom will look like when you have put all your string through and tied them together, your now ready to create your weave.


On this photo I have started my weave but all you need to do to make your weave look like this is just to zig zag your chosen wools and strings around the pegs. My weave looks very compact and tight because if your weave not tight then it will fall apart very easily and the end product won't look very good.


When you have filled your peg loom right to the top with all your chosen products you will need to all of your pegs out and pull them all the through but leave the end ones until last. When you have pulled all the pegs through cut the string where the hole is so you can tie it off and your finished weave will hopefully look like mine. Tada its a  fun and easy thing to do in your spare time and I will be looking forward to purchasing my own peg loom and hopefully creating wonderful things.

Thursday, 5 December 2013

Learning how to knit

Learning how to knit was very difficult and frustrating to begin with, I found it very fiddly and hard to get to grips with. After getting to grips with learning how to knit I enjoyed using my spare time and doing a little knitting, I now find it very therapeutic and calming to do whilst sat down watching the television.

New Project

A few weeks ago we started a new project based around manmade and nature. This project is a very wide open project and I could look at anything I could possibly think of.

Sunday, 3 November 2013

Evalutation: All The Fun Of The Fair


My initial ideas for this project ‘All the Fun of the Fair’ was to create a full sketchbook with ideas and varied things relating to the theme Fun Fairs. Before starting the project I had to gather primary and secondary research to create a full sketchbook to do with fun fairs. I would have found my main primary research by doing such things like visiting theme parks, seaside amusement parks, take pictures, quick sketches and gather leaflets/flyers and etc, later on after collecting this kind of primary research and creating a sketchbook. It would have then been developed further into mood boards, visual sheets and a tracing which would then later on be used in the print room to create a screen which would enable me to make my prints and patterns.

I used many methods of research during the holidays I looked into the wide variety of things that linked off the theme Fun Fairs, when returning back to college I had collected a range of secondary research with plenty of images off various websites, my favourite website to use was Pintrest it was very quick and simple to use and I could find the images I wanted with great ease. A few weeks in after coming back to college we went on a trip to Scarborough, whilst there I took pictures of the arcades and amusements, although due to the terrible weather I could not go into the outdoor fun fair amusements to take proper pictures of rides. Even though the weather wasn’t great I still managed to collect all my primary research, throughout this I have also done drawings and sketches of some of the research I have found.

My time management over the summer was not too great I found myself getting distracted and not getting round to doing a lot of things that I wanted to do, although everything didn’t go as I wanted it to when I came back to college I had a lot of information and images to work from so I did not struggle at all when returning. I am quite disappointed with myself for not buckling down as much during the summer but it was not a problem for when I came back because I had collected a lot of research.

I found great influence from the artists and designers I had found; whether past or present the artists and designers I had chosen helped me and inspired me a lot. My historical choices William Morris and Harry Napper were very memorable and famous designers in the world of textiles they looked at floral patterning which was very beautiful and colourful it inspired me to put a lot of colour and vibrancy into my work. My fun fair artists Kristy Mitchell created a stunning circus bodice that is flawless and the other artists found on the website Folksy designed circus canvases with different circus acts and entertainment so in my tracing, mood boards, visual sheets I looked at more of a circus style.

My approach to my tracing came pretty easily to me; I took inspiration from my sketchbook, mood boards and visual sheets.

Initially throughout the whole project everything has been developed from one another, my mood boards were developed from my sketchbook, my visual sheets were developed from my mood boards and my tracing was developed from picking out patterns from everything I had put together. After developing things further I also experimented with different aspects in my work, I played around with different backgrounds for my mood boards and visual sheets and I experimented making the pigment inks and procion dyes to use on my fabric samples

My experience on the sewing machines went okay, when first starting out on using a sewing machine I had to go through some health and safety procedures, one was if there was not a tutor in the room we would have to stop what we were doing and wait until she came back because if something was to happen whilst she was gone then it would have been out own fault for not listening. The second was to not have any phones or earphones around the sewing machines as if a wire would have been caught or distracted by our phones accidents were bound to happen and lastly long hair must be tied back and hair could be caught in the sewing machine. When I first starting using a sewing machine I was slightly familiar with some things but still had to have a little guidance, sometimes I found it quite frustrating whilst on the sewing machines because I would often get a temperamental machine and it would act up but even though it wouldn’t work I problem solved rather than asking for help constantly, when I got a machine that worked fine I found it very easy to use them.

Before entering the print room health and safety precautions had to be made: gloves and aprons had to worn at all time, gloves had to worn to prevent any allergic reactions from things and to stop hand getting dirty the same is with wearing an apron this was to prevent colourant and dyes getting all over clothes and ruining them. Also long hair had to be tied back to stop hair getting in the way when working. My experience in the print room was very fun and I enjoyed myself a lot, I loved getting hands on with things and getting to create my different prints and designs that I had visualised.

I enjoyed quite a few of the textile processes some of my favourites were devore, felting, screen printing, making homemade paper, machine embroidery and free machining. I think out of them all puff binder was my favourite thing to work with as I loved experimenting with the different colours as sometimes the outcomes were really impressive and I loved how the colours would come out like pastel colours.  But throughout my time I did not like or get to grips with batik, I didn't like how the end result turned out and I found it tricky and messy to deal with as the hot wax would drip everywhere and ruin my work.

Overall everything went very well and I would have changed a lot about what I have done, the only thing that I would have changed is that I accidentally forgot to press and wash out one the procion dyes in my sample which is labelled, but in my technical file I have cut a section off the end of my work to show the difference between what it was like washed and unwashed.

Personal I feel like I have been fine with managing my time and workload, from the start I have ensured that my work has been in on time or before and I have done my work to the best standard I could do it to. My overall satisfaction for my first project on this course is very good, I am very pleased with my work I have produced and the final outcome of my final piece is very neat and tidy and I am more than pleased with how it is presented.


Techniques used throughout project:
  • Screen printing
  • Devore
  • Puffbinding
  • Pigment inks
  • Procion dyes
  • Batik
  • Paper making
  • Felting
  • Layer & Burn
  • Applique/Sewing


My final design choice for my final piece


This is piece i've chosen to recreate and use as my final piece, I have used a A3 piece of calico and on the right hand side I have just used normal puffbinder - Minerfoam B new. I have screenprinted onto this aswell with the colours yellow 2G, red BTL, turquoise 4G and to create the lines of colours down my work when I have used the screen I have just ran down the screen with some of the pigment dye in different places to create different colours in different places. After doing all this I have then used a sewing machine and stitched into certain places.


These are some close ups of the machine embroidery I have used.

On the way to choosing a final piece.


Here is a process we used to choose out a final piece I could recreate, I laid all of my work out onto the table (this is only a little bit of all my work) and members of the class came around and evaluated my work, they then placed a 1 and a 2 on their favourite piece and then moved onto the next person. I found this very helpful and it made it easier to pick a final piece out to recreate.

Samples

These are some of the few samples that will be found in my technical file, these samples are just of my favourite that I have picked out.


This is a piece of A3 cotton, the background has been created by using brusho inks purple and blue and then has been puffbinded onto with minerprint orange G.


This technique is called Devore, I used a piece of A4 Azeta and pushed devore paste through my screen with a squeegee, after using devore paste you have to wash your screen immediately as it can block your screen and your print will come out patchy and not very tidy. After leaving your devore to dry you will then have to place it under a heat press which is set to 180 degrees it is left under there for about 15seconds and then removed and washed. After washing you can dye onto like I have onto mine. 


For this sample I have used A4 Borsalini fabric which i have used puffbinder, the colour puffbinders I have used are minerfoam blue B, minerfoam brill pink 5BTL, Qprint yellow 2G and minerfoam orange G.


Here I have used A3 cotton which i have just kept the background clear and screenprinted onto it in Pink 5BTL and Grey BT pigment dye.


This Fabric is called Habatoi silk and is a very fine soft fabric, I have screenprinted onto this with Grey BT and Violet Blue 2BTL pigment dye.


Here I have created a long A4 stretched piece that shows the continuous repeat pattern in full affect the colours I have used are: yellow 2G, red BTL, orange OL, pink 5BTL, turquoise 4G, grey BT and black SN-G pigment dye.


This is called Heavy visco satin and is very soft to touch I have splashed purple, green and turquoise brusho inks onto the background which have bled out a little and then I have screenprinted on top of this with black SN-G pigment dye.


This is the my final favourite piece I have done, I have just used a A4 piece of calico. I have screenprinted on top of this with yellow 2G, red BTL and turquoise 4G pigment dyes.

Procion and pigment dye colour charts


This is the colour chart that is in our print room, on the top row are the Pigment dyes and the ones underneath are called Procion dyes, after using procion dyes they must be washed out of the fabric as it is not suitable to sell to customers because it can irritate the skin.

Thursday, 24 October 2013

Puffbinder


This is what the puffbinder looks like before applying heat to it.


This is what it looks like during the process of applying heat.


Then this is what it looks like close up.

A few weeks back I used puffbinder on Borsalini fabric, I love the effect puffbinder gives as it puffs up and lifts off your fabric, puffbinder is white to start off with but you can add colour to it. The colours look quite vibrant on your fabric before apply but after you apply heat to make the puffbinder rise you lose some of the colour and the colours becomes quite pastel.


Wednesday, 9 October 2013

Freestyle sewing


On Wednesday 2nd October I had a go at doing freestyle sewing on the sewing machine which involved dropping the feed dogs which would make it harder to control the fabric. I stretched fabric over an embroidery hoop so that the fabric would be nice and tight.

Tracing


This is my tracing I have produced from my visual sheet, when doing my tracing I had to ensure that the lines weren't too thin otherwise there would be a problem when it came to transferring my tracing onto a screen ready for screen printing.

Visual sheets


My visual sheets are developed on from my mood boards, after studying my mood boards and looking at images on them I have taken things that could be used as pattern and look interesting to be placed onto a tracing for a screen print.

Mood boards


These are my mood boards that I have produced on the theme Fun Fairs. A variety of images and materials have been used on my mood board including drawn and painted pictures.


Sewing machine


On the 20th September we started our sewing machine driving lesson, as I was new to using a sewing machine I was a bit unsure what to do. After getting to grips with where everything was on on my sewing machine I started with a variety of patterns and shapes to sew round.